If you’re a designer, you know the importance of using the right tools to create stunning designs.
Figma is a popular collaborative design tool that allows you to design, prototype, and develop products with ease. With Figma, you can create designs for websites, mobile apps, and other digital products and experiences.
Getting started with Figma is easy, and the interface is intuitive and user-friendly. You can quickly create wireframes and prototypes, and collaborate with your team to get feedback and make better decisions. Figma also offers advanced features that allow you to create complex designs and animations, making it a powerful tool for designers of all levels.
- Figma is a collaborative design tool that allows you to design, prototype, and develop products with ease.
- The interface is intuitive and user-friendly, making it easy for beginners to get started.
- Figma offers advanced features that allow you to create complex designs and animations.
Table of Contents
Getting Started with Figma


Figma is a powerful design tool that allows you to create beautiful designs, prototypes, and animations. If you’re new to Figma, this section will guide you through the process of getting started with Figma.
Creating a Free Account
To get started with Figma, you need to create a free account. You can sign up for a free account on the Figma website, and you’ll be able to access all the features of Figma for free.
Installing Figma Desktop App
Once you’ve created your account, you can download the Figma desktop app for Windows or Mac. The Figma desktop app is a great way to get the most out of Figma, as it allows you to work offline, save your designs locally, and use keyboard shortcuts.
To install the Figma desktop app, simply go to the Figma website and download the appropriate version for your operating system. Once the download is complete, double-click the installer and follow the on-screen instructions to install the app.
Figma for Beginners
If you’re new to Figma, you might be wondering how to get started. Fortunately, Figma provides a range of resources to help you get started with the tool.
One of the best resources for beginners is the Figma for Beginners tutorial, which is a four-part tutorial that covers the basics of designing a social media app in Figma. The tutorial covers everything from the fundamental tools you’ll use, to creating wireframes, high-fidelity designs, and a prototype.
In addition to the Figma for Beginners tutorial, Figma also provides a range of other resources, including tours to help you get to know the basics of navigating Figma and FigJam files.
ℹ️ Remember
Overall, getting started with Figma is a straightforward process that involves creating a free account, downloading the Figma desktop app, and using the resources available to you, such as the Figma for Beginners tutorial. With a bit of practice and patience, you’ll be able to create stunning designs in no time.
Understanding the Figma Interface

When you first open Figma, you’ll be greeted with a clean and intuitive interface. Understanding the different parts of the interface is key to making the most out of this powerful design tool. In this section, I’ll break down the different components of the Figma interface and show you how to navigate them.
Navigating the Menu
The Figma menu is located at the top of the browser window. Here, you’ll find all the different options for creating, opening, and saving your designs. You can also access keyboard shortcuts and other settings from the menu. Some of the most important options you’ll find in the Figma menu include:
- File: Here, you can create new files, open existing ones, and save your work.
- Edit: This menu contains options for editing your designs, such as undo/redo, copy/paste, and group/ungroup.
- View: Use this menu to zoom in and out of your designs, show/hide different layers, and adjust grid settings.
- Plugins: Figma has a robust plugin ecosystem that allows you to extend the functionality of the app. You can access and manage your plugins from this menu.
Exploring the Toolbar
The Figma toolbar is located on the left side of the screen. This is where you’ll find all the different tools for creating and editing your designs. Some of the most commonly used tools in the Figma toolbar include:
- Selection tool: This is the default tool that allows you to select and move objects around your canvas.
- Frame tool: Use this tool to create frames, which are like containers that hold your design elements.
- Shape tool: This tool allows you to create different shapes, such as rectangles, circles, and polygons.
- Text tool: Use this tool to add text to your designs.
- Pen tool: This tool allows you to draw custom shapes and paths.
Understanding Left and Right Sidebar
The left and right sidebars in Figma contain important information and tools that you’ll use frequently. Here’s a breakdown of what you’ll find in each sidebar:
- Left sidebar: This is where you’ll find all the different layers and objects in your design. You can use the left sidebar to organize your design elements and adjust their properties.
- Right sidebar: The right sidebar contains information about the currently selected object or layer. Here, you can adjust properties such as size, position, and color. You can also access design assets and styles from the right sidebar.
ℹ️ Remember
Overall, the Figma interface is designed to be intuitive and easy to use. By familiarizing yourself with the different parts of the interface, you’ll be able to create beautiful designs more quickly and efficiently.
Working with Figma Design
When working with Figma Design, you have access to a wide range of tools and features to create stunning designs. In this section, I’ll cover some of the basics of working with Figma Design, including creating frames and shapes, using text tools, applying fill, stroke, and effects, and Figma responsive design.
Creating Frames and Shapes
One of the first things you’ll need to do when working with Figma Design is to create frames and shapes. Frames are containers that hold your design elements, while shapes are the building blocks of your designs. To create a frame, simply click on the Frame tool in the left-hand toolbar and drag it onto the canvas. To create a shape, click on the Shape tool and drag it onto the canvas.
Using Text Tools
Figma Design also includes a range of text tools that you can use to add text to your designs. To add text, simply select the Text tool from the left-hand toolbar and click on the canvas where you want to add the text. You can then type your text and use the text tools to format it as needed.
Applying Fill, Stroke, and Effects
To add color to your designs, you can use the Fill and Stroke tools. The Fill tool allows you to add color to the inside of your shapes and frames, while the Stroke tool allows you to add color to the border. You can also apply effects to your designs, such as drop shadows, blurs, and more, using the Effects tool.
Figma Responsive Design
Figma Design also includes features that allow you to create responsive designs that adapt to different screen sizes. To create a responsive design, simply use the Constraints tool to set the position and size of your design elements relative to the edges of the frame. This will ensure that your design looks great on any screen size.
ℹ️ Remember
Overall, Figma Design is a powerful tool that gives you everything you need to create stunning designs. With its intuitive interface and wide range of features, you’ll be able to bring your ideas to life in no time.
Advanced Figma Features

If you’re looking to take your Figma game to the next level, there are several advanced features you should be familiar with. In this section, we’ll cover some of the most useful advanced features, including Figma Auto Layout, Working with Components and Layers, and Exporting Designs.
Figma Auto Layout
Figma Auto Layout is a powerful feature that allows you to create responsive designs quickly and easily. With Auto Layout, you can create elements that adjust automatically based on the content inside them, making it easy to create designs that look great on any device.
Auto Layout is particularly useful for creating designs for mobile and web applications, where screen sizes can vary widely. By using Auto Layout, you can ensure that your designs look great on any screen size, without having to manually adjust each element.
Working with Components and Layers
Components and Layers are two of the most important features in Figma, and they can help you work more efficiently and effectively. Components are reusable elements that you can use throughout your designs, while Layers help you organize your designs and make them easier to work with.
By using Components, you can create designs more quickly and consistently, since you can reuse the same elements across multiple designs. And by using Layers, you can keep your designs organized and easy to navigate, even as they become more complex.
Exporting Designs
Once you’ve created your designs in Figma, you’ll need to export them in order to share them with others or use them in other applications. Fortunately, Figma makes it easy to export your designs in a variety of formats, including PNG, JPG, SVG, and PDF.
When exporting your designs, it’s important to consider the resolution and quality of the images you’re exporting. You’ll want to make sure that your images are high enough quality to look good when printed or displayed on a high-resolution screen.
ℹ️ Remember
In conclusion, by mastering these advanced Figma features, you can take your design skills to the next level and create more professional and polished designs. Whether you’re working on a mobile app, a website, or any other type of design project, these features can help you work more efficiently and effectively, saving you time and effort in the long run.
Prototyping in Figma

Figma is a powerful design tool that allows you to create interactive prototypes for your designs. Prototyping in Figma is a great way to test out your designs and get feedback from others. In this section, we will explore how to create interactive prototypes and share them with others.
Creating Interactive Prototypes
Creating interactive prototypes in Figma is easy. You can create links between frames and elements within frames to create a flow that users can interact with.
To get started, you need to establish which screen will be the first screen in your prototype. Under the “Starting Frame” heading in the Inspector, click the dropdown and select the frame that you want to be the starting point.
Once you have your starting frame, you can create links between frames by selecting an element and then clicking the “Prototype” tab in the right sidebar. From there, you can set up the link to the next frame. You can also set up interactions such as hover effects, click effects, and more.
Sharing and Gathering Feedback
One of the great things about prototyping in Figma is that you can easily share your prototypes with others. You can share a link to your prototype with anyone, and they can view and interact with it in their browser. This makes it easy to gather feedback from others and make improvements to your design.
To share your prototype, click the “Share” button in the top right corner of the screen. From there, you can choose who you want to share the prototype with and whether or not they can comment on it. You can also set a password to protect your prototype if you want to keep it private.
ℹ️ Remember
Overall, prototyping in Figma is a great way to test out your designs and get feedback from others. By creating interactive prototypes, you can see how users will interact with your design and make improvements before you start coding. And by sharing your prototypes with others, you can get valuable feedback that will help you create a better design.
Collaboration and Teamwork

Collaboration is at the heart of Figma, making it one of the most powerful design tools available today. The platform is designed to help you and your team work together seamlessly, whether you’re in the same room or on opposite sides of the world. Here are some of the key features that make collaboration in Figma so effective:
Understanding Multiplayer Mode
Figma’s Multiplayer Mode is what makes real-time collaboration possible. With Multiplayer Mode, you and your team can work on the same design file simultaneously, seeing each other’s changes in real-time. This means that you can get feedback and make changes on the fly, without having to wait for someone else to finish their work.
Collaborating in Real Time
Collaborating in real-time is one of the most powerful features of Figma. It allows you to work together with your team members, seeing each other’s changes as they happen. This means that you can get feedback and make changes on the fly, without having to wait for someone else to finish their work.
Figma Community and Resources

If you’re looking to expand your Figma skills or find inspiration for your design projects, the Figma Community is an excellent resource to explore. In this section, we’ll cover how to make the most of the Figma Community and its resources.
Exploring the Figma Community
The Figma Community is a place where designers from all over the world come together to share their work, collaborate, and offer feedback. You can browse through thousands of design files, plugins, UI kits, and other resources created by the community members. You can also join discussions, ask questions, and get help from other designers.
To access the Figma Community, click on the “Community” tab in the Figma app. From there, you can search for specific resources or browse through the trending and featured content.
Finding Inspiration and Templates
One of the main benefits of the Figma Community is the abundance of inspiration and templates available. Whether you’re looking for UI kits, icons, or design systems, you can find them all in the Figma Community. You can use these resources as a starting point for your own designs or modify them to fit your specific needs.
To find inspiration and templates in the Figma Community, use the search bar to look for specific keywords or browse through the various categories. You can also filter the results by popularity, date, or type of resource.
Accessing Documentation
In addition to the community resources, Figma also provides extensive documentation to help you learn and use the app more effectively. The documentation covers everything from the basics of using Figma to more advanced topics like collaboration, prototyping, and design systems.
To access the Figma documentation, click on the “Help” tab in the Figma app or visit the Figma Help Center website. You can search for specific topics or browse through the various categories to find what you need.
ℹ️ Remember
Overall, the Figma Community and its resources are an excellent way to enhance your design skills and find inspiration for your projects. By exploring the community, finding templates, and accessing the documentation, you can take your Figma designs to the next level.
Figma Plugins and Integrations

Figma is a popular design tool that offers a range of features to help designers create stunning designs. However, what makes Figma even more powerful is the wide range of plugins and integrations available to users. In this section, we will take a closer look at some of the popular Figma plugins and how you can integrate Figma with other tools.
Popular Figma Plugins
Figma has a thriving community of developers who create plugins to help designers streamline their workflow. Here are some of the popular Figma plugins you might find useful:
Ando: This AI-powered plugin helps you visualize your design ideas from simple text prompts, streamlining your design process and giving you innovative ideas.
EightShapes Specs: This plugin generates component specs, including anatomy, props, layout, and spacing, making it easier for developers to understand the design.
SVG animation: This plugin generates SVG animations, making it easier to create interactive designs.
Swap to Local Color Variables: This plugin allows you to reassign layers bounded to external color variables to local ones of the same name in a matter of seconds.
Figma to Flutter Code: This plugin converts Figma designs to code with detailed code. Just select the frame and change to dev mode.
Integrating with Other Tools
Figma also offers integrations with other popular tools, making it easier for designers to work with their favorite tools. Here are some of the popular integrations:
Slack: With the Figma and Slack integration, you can share Figma files and receive notifications directly in Slack.
Trello: The Figma and Trello integration allows you to add Figma files to your Trello cards, making it easier to share your designs with your team.
InVision: The Figma and InVision integration allows you to import your Figma designs directly into InVision, making it easier to create interactive prototypes.
Zeplin: The Figma and Zeplin integration allows you to export your Figma designs to Zeplin, making it easier for developers to access the design specs.
Adobe Creative Cloud: The Figma and Adobe Creative Cloud integration allows you to import your Adobe XD files directly into Figma, making it easier to switch between the two tools.
ℹ️ Remember
In conclusion, Figma has a wide range of plugins and integrations available, making it a powerful tool for designers. By using these plugins and integrations, you can streamline your workflow and work more efficiently with your team.
Figma for Different Roles
If you’re a designer, developer, educator, or student, Figma has something to offer you. Here’s a breakdown of how Figma can be used by different roles:
Figma for Designers
Figma is a popular tool for designers, and for good reason. It has a wide range of features that make it easy to create and collaborate on designs. Some of the key features that designers will appreciate include:
Real-time collaboration: With Figma, you can collaborate with other designers in real-time. This means that you can work together on the same design file, making changes and offering feedback as you go.
Design system management: Figma makes it easy to create and manage design systems. You can create reusable components, styles, and assets that can be used across multiple designs.
Prototyping: Figma has built-in prototyping tools that allow you to create interactive prototypes of your designs. This is a great way to test out your designs and get feedback from stakeholders.
Figma for Developers
Developers can also benefit from using Figma. Here are some of the ways that developers can use Figma:
Inspecting designs: Figma makes it easy to inspect design files and get all the information you need to build out the design. You can see the measurements of each element, the colours used, and more.
Exporting assets: Figma makes it easy to export assets in a variety of formats. This means that developers can quickly get the assets they need to build out the design.
Collaborating with designers: Figma’s real-time collaboration features make it easy for developers to work with designers. They can offer feedback and ask questions as they work on building out the design.
Figma for Educators and Students
Figma is a great tool for educators and students alike. Here are some of the ways that Figma can be used in the classroom:
Teaching design: Figma can be used to teach design principles and techniques. Students can work together on design projects, learning from each other as they go.
Collaborating on projects: Figma’s real-time collaboration features make it easy for students to work together on projects. They can offer feedback and make changes to the design in real time.
Creating portfolios: Figma can be used to create design portfolios. Students can use Figma to create and showcase their design work, making it easy for potential employers to see their skills and experience.
ℹ️ Remember
In summary, Figma is a versatile tool that can be used by designers, developers, educators, and students. Its real-time collaboration features, design system management tools, and prototyping capabilities make it a powerful tool for anyone working in the design space.
Figma Pricing

If you are interested in using Figma, you will be glad to know that it offers a range of pricing plans to suit different needs and budgets. Here is a breakdown of the different pricing plans:
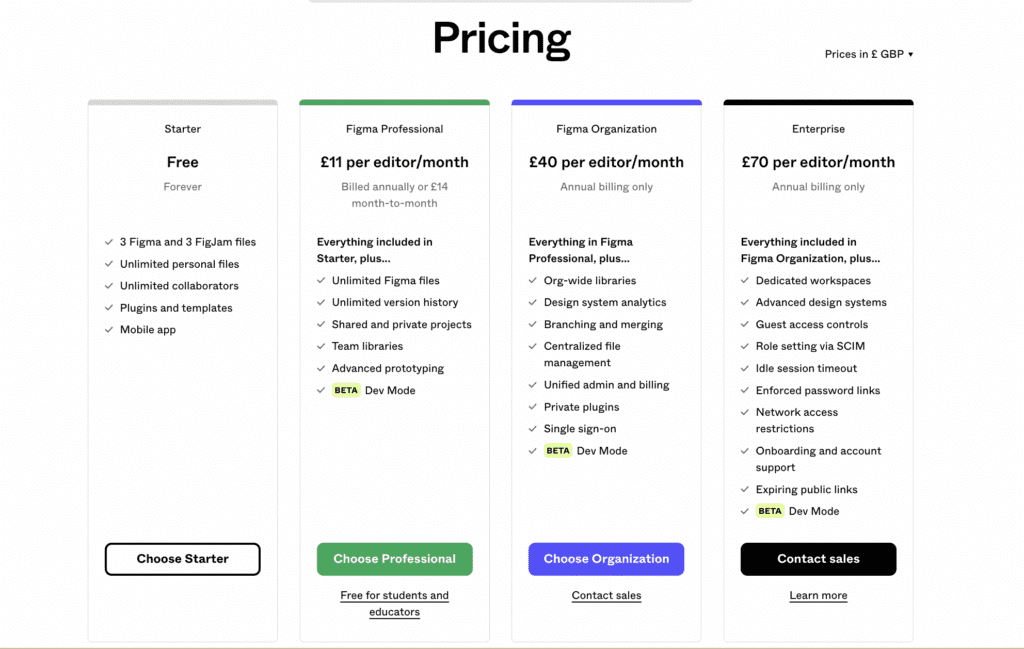
Starter Plan
The Starter Plan is a free plan that comes with a few limitations. With this plan, you can create up to three Figma design files and three FigJam files. You can also have unlimited personal files and collaborators. Additionally, you can access plugins and templates, and use the mobile app. This plan is ideal for personal use and getting started with Figma.
Professional Plan
The Professional Plan is the next level up and comes with more features. This plan costs $12 per editor per month when billed annually or $15 per editor per month when billed monthly. With this plan, you can create unlimited projects, Figma files, and pages. You can also access unlimited version history, sharing permissions, team libraries, and audio conversations. This plan is ideal for professional use and design teams.
Organization Plan
The Organization Plan is the most advanced plan and is designed for larger teams and organizations. This plan comes with all the features of the Professional Plan and additional features such as centralized billing, advanced security, and custom branding. The pricing for this plan is customized based on your specific needs, so you will need to contact Figma’s sales team to get a quote.
Cost Comparison
Figma offers a cost comparison calculator on their website that allows you to compare the cost of using Figma with other design tools such as Sketch, InVision, Zeplin, Avocode, and Abstract. This tool can help you make an informed decision about which tool is the best fit for your needs and budget.
Conclusion
In conclusion, Figma is a versatile and powerful design tool that allows you to create stunning designs, prototypes, and collaborative design systems. Whether you are a seasoned designer or a beginner, Figma’s intuitive interface makes it easy for you to create designs that meet your needs.
With Figma, you can easily collaborate with your team members in real-time, making it a great tool for remote teams. You can use Figma to create stunning prototypes that you can share with your clients or stakeholders, and get their feedback in real-time.
Figma also offers a wide range of design tools that allow you to create custom icons, product designs, and effective app designs. You can use Figma to create wireframes, user interfaces, and other design elements that help you bring your ideas to life.
If you are looking for a design tool that is easy to use, versatile, and collaborative, then Figma is definitely worth considering. With Figma, you can create stunning designs that meet your needs, collaborate with your team members in real-time, and create prototypes that help you bring your ideas to life.
Read more
Frequently Asked Questions
Figma is a web-based design tool that allows for real-time collaboration and prototyping. Adobe, on the other hand, offers a suite of desktop-based design tools. While Adobe has been a staple in the design industry for years, Figma has gained popularity due to its ease of use and collaborative features. Figma also offers a free plan, while Adobe requires a subscription.
The Figma Community is a great place to find resources such as design templates, plugins, and tutorials. There are also several websites and YouTube channels dedicated to Figma tutorials and tips, such as FigmaCrush and DesignCourse.
Figma offers several benefits, such as real-time collaboration, cloud-based storage, and automatic updates. It also allows for easy prototyping and sharing of designs with team members and clients. Figma’s vector-based design tools make it easy to create scalable designs for a variety of platforms.
To design a login page in Figma, start by creating a new file and selecting the appropriate artboard size. From there, you can use Figma’s design tools to create the layout and design of the login page. You can also use plugins such as Google Sheets Sync to create dynamic login forms.
Some tips for using Figma include utilizing keyboard shortcuts, organizing your layers and frames, and using plugins to streamline your workflow. It’s also important to take advantage of Figma’s collaborative features and share your designs with team members for feedback.
Yes, Figma offers a free plan that includes up to three projects and unlimited cloud storage. The free plan also includes basic design tools and access to the Figma Community. Upgrading to a paid plan unlocks additional features such as team collaboration and advanced design tools.


8 Profitable Digital Products To Sell in 2023 (#2 You Need)
Now you know more about figma, use your skills to start creating digital products you can sell and create passive income